
 |
|
| Technobabble Post your general Need for Help questions here.
• Lossy or Lossless? Moderators |
 |
|
|
Thread Tools |
|
#1
|
|||
|
|||
|
Creating DVD/CD Cover Art Guide
Tim’s (trbrown4) Guide To The Basics Of Creating Cover Art
Intro I was asked to put this little “how-to” guide together. By no means am I an expert or a professional in this field. I figured most of these tricks out on my own and have been fairly happy with the results. Take from this what you will, and if you have any comments or additions to this guide please contact me. I hope that some of you will find this helpful and that you will begin/continue to create cover art and spread it to the community. Enjoy! Who Is This For? This guide is aimed at the user who has a fair amount of computer knowledge and has some basic computer problem solving skills. If you already are able to create cover art that other people like and are able to create art that you would be willing to post online, this probably is not for you. If you have the desire to create some cool art, but little Photoshop experience, this guide is for you. To create cover art for my DVD/CD collection I use Adobe Photoshop 7.0. So this guide will be geared towards a Photoshop 7.0 user. I am sure that there are other graphic programs that can be used, even older versions of Photoshop, many with the same tools. But, this guide is based in Photoshop 7.0. Below are a few templates for you to use as blank canvases, one for the front of CD jewel case and one for a standard DVD case. I did not create the DVD template, I found in about 2 years ago on Sharingthegroove (RIP). CD Cover  DVD Cover  Before You Begin…. Grab yourself a copy of Adobe Photoshop and start a nice image collection. To find and gather images I use Google’s Image search. This tool is a lifesaver for any digital artist. http://www.google.com/imghp?hl=en&ta...-US:official_s Bookmark this site! Use it, and use it often. Since you will not be using this art for profit, you do not need to worry about copyright and image licensing. However, it is polite to at least grant credit to a photographer if you use their work in your art and get their permission first. I often use Google’s Image Search to gather images for background art for my covers. Try and grab the highest resolution possible. There is a search option that will look for “large”, “medium” or “small” images. You will also want to build your collection of fonts. The basic ones that are built into your OS will get old…very quick. There are tons of free fonts out there for every OS….thousands of them. It takes some time to collect and install them, but it will be worth it when you find that you have a huge collection of fonts to choose from! A Couple Of Useful Tools In Photoshop: Undo Oh yeah…and remember that UNDO is your friend! Ctrl-Z at anytime to undo what you just did, this is a lifesaver. Zooming You can zoom in and out of your image to get a close up view or see the big picture. Zoom in Ctrl +, zoom out Ctrl - Saving As soon as you have completed your first step on any art work it is a good idea to save your art in case something tragic happens. Save every few minutes or after every major step/addition. It sucks to lose something that you have just spent a lot of time on. File->Save will allow you to save in Photoshop format. PSD format keeps all of your layers intact and makes it super simple to edit later. Always keep a saved copy of your art in PSD for later edits!!! TO save in JPG or any other common image format….. File->Save-as and the select your format. Let’s Begin…. I will guide from beginning to end of the creation of some custom DVD artwork. All of these techniques can be used in various types of artwork, so feel free to play around. Start up Photoshop and open up a template, either CD or DVD. OK, so now what??? Just a blank white canvas??? No, that just won’t do. You’ve got to add some sort of background. You can either choose a solid color and fill it in using the paint bucket tool, or you can use a higher resolution back ground image. 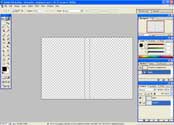 Setting Your Background Image Open an image which you would like to use as a background or the base of your art work. Select all (Ctrl-A) to select the entire image and copy (Ctrl-C). Once you have “selected all” you will notice a moving dotted line outlining the image. 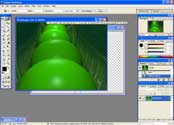 Close the image window out and make sure the open template is selected. Paste (Ctrl-V) the image into open template. 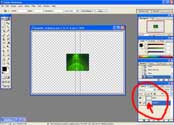 Now your copied and pasted background image appears in your template. Notice that it automatically created a new layer in the layers window. I have circled this in red for you to see. So, the image is there and now you need to resize that layer to fit the template. First grab the image and drag it to one corner. Edit->Transform-Scale and drag by one of the corners to stretch it as much as you would like. When you have resized the background image to the desired size press enter to make it official. Now you should have something that looks like this. 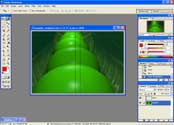 Making A Color Overlay Layer To Dull The Image Down A Bit If you plan adding a lot of detail over your background image, you may want to consider dulling the background color a little bit. This is strictly a judgment call on your part, and it is easy to reverse if you decide against it later. First, create your new layer. Layer->New->Layer. Once you have done this a window will pop up enabling you to name this layer. For organizational purposes name it something like “Color Overlay”. Select layer opacity to around 50%, this makes the layer transparent. Feel free to experiment later with which percentage you prefer. To do this simply right-click on the layer and adjust the opacity percentage in the “Blending Options” menu. Ok, so now that you have created you new layer with an opacity percentage less than 100 you can now fill it in using a dull shade like grey or white. Select the “Color Overlay” layer and select the paint bucket tool (follow the red arrow below). Then select the color you will use to fill in using the color selector tool (follow the blue arrow below). 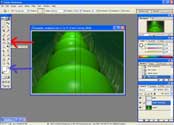 Once you have selected the paint bucket tool and you color, fill it in. I used white to fill in and it looks like this now: 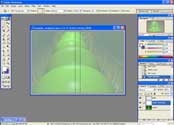 If you don’t like it, you can simply change the color or opacity. Easy as pie! Or you can just do away with the overlay layer altogether by deleting it from your layer window. You can always just click on the little eye to hide that layer and see what your image will look like with out that layer. You can add additional pictures or artwork over top (or behind) using the same blending/opacity techniques to mix it all up and make and very interesting background. Experiment and have fun! Adding Text So, it may be a good idea to label the covert art with important information regarding the contents of the disc(s). Text is fairly easy to include and alter. Select the text tool (follow the dark green arrow below.) Select you font style and size (follow the gold arrow below.) Set the cursor where ever you want to add your text. 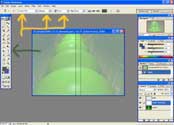 Every time that you select the text tool and place the cursor it will create a new layer for that text. You can edit text in an already established letter by selecting the text tool at any time and click on the text that you want to edit. This takes some getting used to, but eventually you will get the hang out it. Earlier version of Photoshop required you to select the layer first and then place the cursor. Gotta love version improvements! You will also notice that when the text tool is selected there are many text options located along the top of the window. The ‘right justify’ ‘center justify’ and ‘left justify’ buttons are essential. You can use different fonts and sizes within one layer, just select the text that you want to edit and go for it. Now that you have placed text on the front and back cover you will want to label the spine. There are two ways to do this. You can either enter the text and then rotate it OR you can rotate the entire image, add the text ad then rotate back. I prefer the later. Image->Rotate Canvas->90 deg. CCW. Select you text tool, place your cursor and type away. You should have something that looks like this: 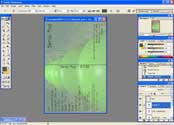 Now rotate the image back by doing… Image->Rotate Canvas->90 deg. CW. Text Effects These are also very easy with newer versions. Select the text layer that you want to add an effect to and then select all of the text that you want affected. Layer->Layer Style->(Which ever style you want to play with). I like to use the ‘drop shadow’ and ‘stroke’ styles with text. There are many parameters that you can edit and play with. Have fun and experiment. So I have decided to add a drop shadow to the band name text on the front cover, and here is how it looks (I zoomed in) 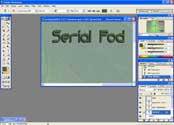 These same layer style effects can be applied to images and other object with in your image. Simply assign it to a new layer and “style” away. Adding Misc. Stuff So to make your final art look even more impressive add a “Warning” to the back cover and a “DVD” logo to your spine. My typical warning sounds something like this: WARNING: This DVD was created by fans of the BAND NAME live experience for fans and should not be profited from in anyway. Please support the free trade of live music. Cover Art designed by YOUR NAME So, feel free to add that. Below is a generic DVD logo to insert on to the spine. You will want to add this just as you did your initial background image. Before you put it in your art you may want to change the color to match the theme of your art. Open it, copy it, paste it and resize it. I sometimes even add a drop shadow  You can also add a cute little logo or band picture in the upper part of the spine if you want to. Get creative! So after adding these here is what we have: 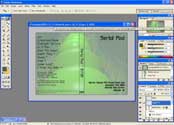 Printing Now that you have spent many minutes creating this art you will want to print it. If you used the template that I gave you, it will print out to the appropriate size if you set the print layout to ‘Landscape’. Print settings vary for each printer manufacturer so you will have to play around and figure it out. I almost always use matte (not glossy) photo paper for my art. I use the brand made by my printer manufacturer. I never would have thought that this made as much of a difference, it truly does. You can always use regular paper stock if you like, just don’t expect top photo quality results. Also, I never use generic ink. I used to years ago in my old printer but I found that over time the print quality got worse. I don’t know how to explain this, but I only use brand name ink now. I guess if you want top results you have to be willing to pony up the dough for the real stuff. I have been using a Canon i560 with Canon Ink and Canon Matte Photo paper for the last 18 months or so and have been very pleased with the results. No members have liked this post.
|
|
#2
|
|||
|
|||
|
Re: Creating DVD/CD Cover Art Guide
Any feedback/suggestions or whatever is welcomed

No members have liked this post.
|
|
#3
|
||||
|
||||
|
Re: Creating DVD/CD Cover Art Guide
Well, as I wrote in the Staff thread... will imageshack host those images indefinitely? If not, we should probably put them on the TTD server.
Also, you may want to make that Google image look like this: Google Image Search Otherwise, it looks really nice. He did a good job writing it and you did a good job formating it.
__________________
ABT Seeding Policy | ABT Seeding Guide | VBT Seeding Policy | VBT Seeding Guide Software Links HERE | FAQ is HERE | Technobabble forum is HERE. If your port number is in red, you are firewalled! How to Set Up Your Router (so you aren't firewalled) and How to Port Forward on Windows XP Five's Checksums Demystified - everything and anything you want to know about checksums
On a Mac? Get XLD to rip your CDs. Please see this guide - X Lossless Decoder (XLD): How to create flawless CD rips on Mac OS X No members have liked this post.
|
|
#4
|
|||
|
|||
|
Re: Creating DVD/CD Cover Art Guide
Quote:
Can we move those images to our server? I know imageshack willl hold them for a long time, I just dont know HOW long. Thanks Lynne 
No members have liked this post.
|
|
#5
|
||||
|
||||
|
Re: Creating DVD/CD Cover Art Guide
yes, it is really good
impossible to cover every last option that photoshop offers, this does a really good job to help ppl get started. the layout you did is really nice, too
__________________
Checksums Demystified | ask for help in Technobabble thetradersden.org | ttd recommended free software/freeware webring shntool tlh eac foobar2000 spek audacity cdwave vlc Quote:
No members have liked this post.
|
|
#6
|
|||
|
|||
|
Re: Creating DVD/CD Cover Art Guide
THanks guys

No members have liked this post.
|
|
#7
|
||||
|
||||
|
Re: Creating DVD/CD Cover Art Guide
moving to tb.
any suggestions/corrections/updates pls post here.
__________________
Checksums Demystified | ask for help in Technobabble thetradersden.org | ttd recommended free software/freeware webring shntool tlh eac foobar2000 spek audacity cdwave vlc Quote:
No members have liked this post.
|
 |
| The Traders' Den |
 Similar Threads
|
||||
| Thread | Forum | Replies | Last Post | |
| Can't Find The Cover Here? External CD / DVD Cover Art Links - thisistoto | DVD Covers | 41 | 2017-03-13 10:33 AM | |
| Tim’s (tbrown4) Guide To The Basics Of Creating Cover Art - thisistoto | Covers | 10 | 2015-12-06 11:36 PM | |
| Can't Find The Cover Here? External CD / DVD Cover Art Links - thisistoto | CD Covers | 52 | 2009-12-02 08:01 PM | |
| Can't Find The Cover Here? External CD / DVD Cover Art Links - thisistoto | Covers | 36 | 2007-10-05 03:46 AM | |
| Creating a .torrent - LeonJackson | Technobabble | 4 | 2007-06-30 12:10 PM | |
|
|